Introduction
Want to create a peaceful backyard water retreat?
Pond DIY construction is gaining popularity across the USA as homeowners seek affordable ways to bring more relaxation to their outdoor living spaces. A well-built pond creates a peaceful retreat, adds beauty, reduces stress, and attracts birds and helpful wildlife. Many beginners avoid it because they think it’s expensive or too technical.
The truth is, you don’t need expert skills to get started. With the right plan, even first-time DIYers can create a beautiful pond. Whether you’re thinking about a simple backyard design or want to try your hand at a DIY koi pond, the process is easier than you might expect.
In this guide, you’ll discover step-by-step DIY pond construction methods that actually work. Start transforming your backyard today—plan, build, and maintain your pond with confidence. By the end, you’ll know exactly how to create a pond that fits your space, budget, and style. Take the first step and bring your water retreat to life!
If you’re new to ponds and want a simpler approach, check out this complete backyard pond setup guide to understand the basics before starting construction.
Planning Your DIY Pond
Careful planning makes DIY pond construction easier and avoids costly mistakes. Many beginners rush this step and face issues like poor water flow or sizing. Plan your pond’s location, type, and budget before digging.
With a solid plan in place, you’re ready to move on to the next crucial step: choosing the best location for your pond.
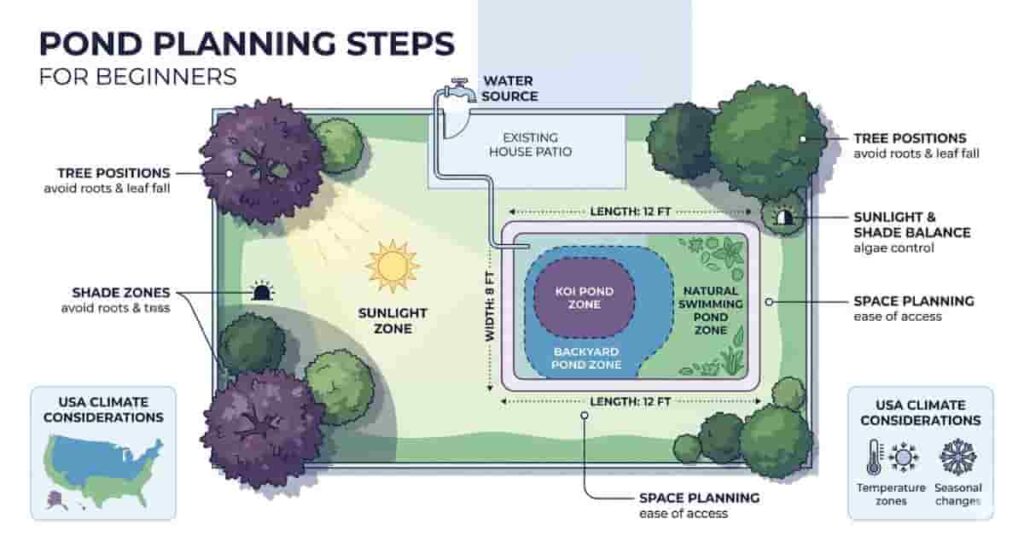
Choosing the Right Location
Pick a spot that gets 4–6 hours of sunlight daily. Too much sun can cause algae growth, while too much shade slows plant growth. Balance is key.
Avoid placing your pond under large trees. Falling leaves can clog filters and pollute the water. Roots may also damage the liner over time. Choose an open space with enough room for maintenance access.
Make sure a water source is nearby for easy filling and topping up. A level surface is also important to prevent uneven water distribution.
If you live in the USA, consider your climate. In colder regions, ponds need deeper areas to prevent freezing. In hot states, partial shade helps control water temperature and evaporation.
Pro Tips:
- Avoid low areas where rainwater collects.
- Keep the pond visible from your home for easy monitoring.
- Place near a power source for pumps and filters
Deciding Pond Type & Size
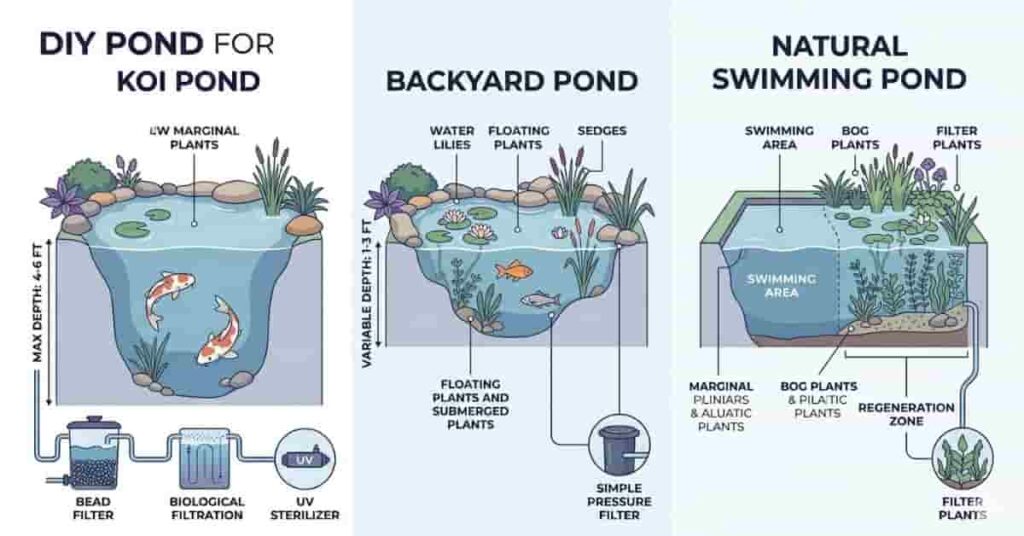
Your pond type depends on your goal and maintenance level. The three common options include:
- Koi pond: Deep, requires strong filtration and aeration
- Backyard pond: Decorative, beginner-friendly, easier to maintain
- Natural swimming pond: Larger, eco-friendly, more complex setup
For size, start small if you’re a beginner. A pond between 500 and 1000 gallons works well for most homes. Larger ponds offer better water stability but need more budget and effort.
Depth is also important. Koi ponds should be at least 3–4 feet deep. Shallow ponds work for plants but may overheat quickly. Choose a shape that fits your yard, whether natural curves or a formal design.
Budgeting & Material List
Setting a budget helps you avoid overspending during diy pond construction. Costs vary based on size, materials, and features.
Here’s a basic material list:
- Pond liner (rubber or PVC)
- Pump and filtration system
- Rocks and gravel
- Aquatic plants
- Fish (optional)
- Pipes and fittings
You’ll also need tools like a shovel, level, measuring tape, and hose.
Typical cost estimates:
- Small pond: $200–$500
- Medium pond: $500–$1500
- Large pond: $1500+
Keep extra budget for unexpected expenses like liner repairs or additional filtration.
For smaller spaces or budget-friendly ideas, this small garden pond setup guide can help you build a compact and efficient pond.
Types of DIY Ponds
Choosing the right pond type is a key step in pond DIY construction. Each type has different needs, costs, and maintenance levels. Your choice depends on your goal, space, and how much time you can manage.
Some ponds focus on fish, while others focus on design or swimming. Understanding these differences helps you avoid mistakes and build a pond that fits your lifestyle.
DIY Koi Pond Construction
DIY koi pond construction focuses on creating a safe and stable environment for fish. Koi need clean, oxygen-rich water to stay healthy and grow properly.
Depth is very important. A koi pond should be at least 3–4 feet deep to protect fish from temperature changes and predators. Deeper water also helps during winter in colder regions.
Filtration and aeration are essential. Use a strong pump and filter system to handle fish waste. Add an air pump or waterfall to increase oxygen levels.
Safety is another key factor. Avoid sharp rocks that can injure fish. Maintain stable water quality by testing pH and ammonia levels regularly.
Pro Tips:
- Overstocking fish can harm water quality.
- Install a bottom drain for easier cleaning.
- Feed fish in small amounts to reduce waste.
DIY Backyard Pond Construction
DIY backyard pond construction is perfect for beginners who want a simple and attractive water feature. These ponds focus more on design than fish care.
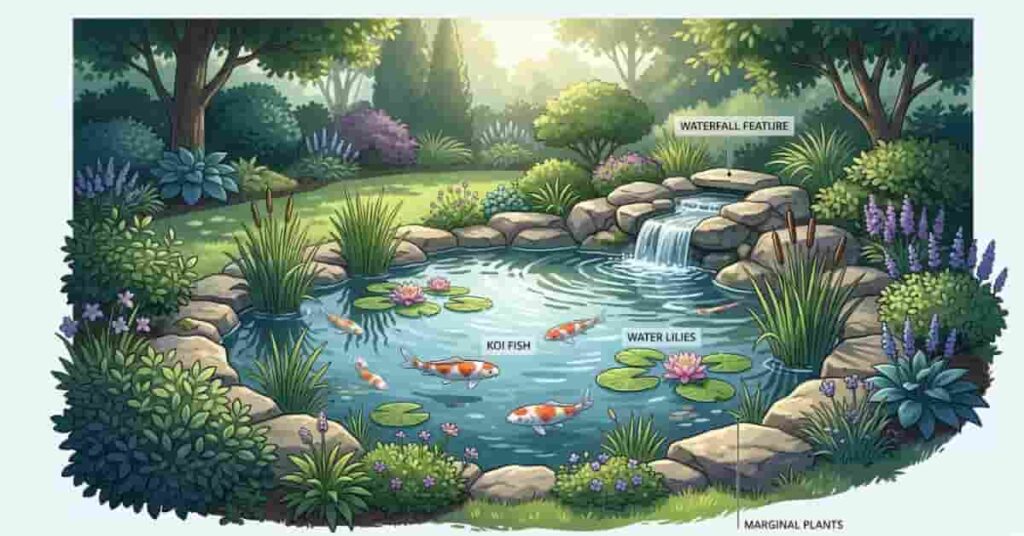
You can create a natural look using rocks, gravel, and plants. Curved shapes often blend better with garden landscapes. Edge finishing is important to hide the liner and improve the appearance.
Decorative plants like lilies and floating plants add beauty and help control algae. You can also add small fish like goldfish, but heavy filtration is not always needed.
These ponds are easier to build and maintain compared to koi ponds. They also cost less, making them ideal for first-time DIY projects.
Pro Tips:
- Use different plant levels for a layered look.
- Add a small waterfall for sound and movement.
- Keep edges stable to prevent soil collapse.
DIY Natural Swimming Pond Construction
DIY natural swimming pond construction combines a swimming area with natural filtration. These ponds use plants and biological systems instead of chemicals.
Unlike decorative ponds, swimming ponds have two zones:
- Swimming zone (clear water area)
- Regeneration zone (plants filter the water)
Water clarity depends on proper design and plant balance. Gravel beds and aquatic plants act as natural filters. A pump helps circulate water between zones.
Safety is very important. Ensure proper depth for swimming and avoid slippery edges. Regular maintenance keeps water clean and safe for use.
These ponds require more space and planning but offer a chemical-free swimming experience.
Pro Tips:
- Choose native plants for better filtration.
- Maintain good water circulation.
- Test water quality regularly for safety
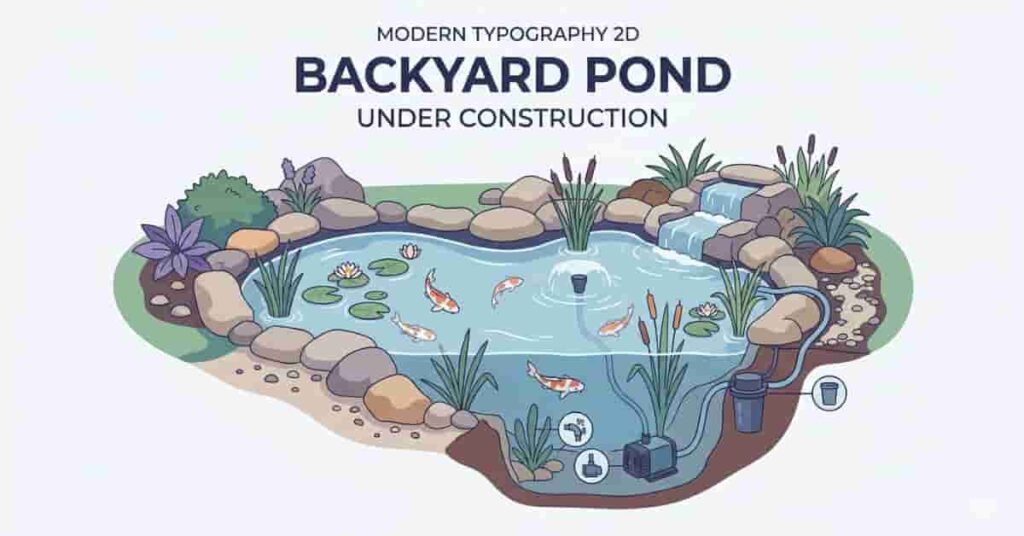
Step-by-Step Pond DIY Construction Guide
This is where your pond starts to take shape. A clear, step-by-step plan makes pond DIY construction simple, even for beginners. Follow each stage carefully to avoid leaks, poor circulation, or cloudy water.
Work slowly and double-check each step. Small mistakes early can cause bigger problems later. With the right approach, you can build a strong and long-lasting pond.
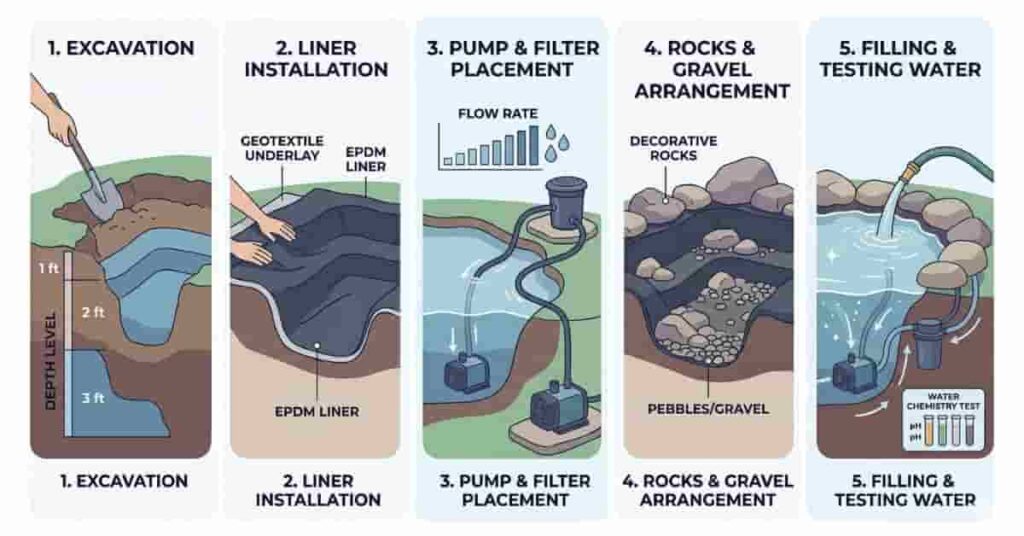
Excavation & Liner Installation
Start by marking your pond shape using rope or spray paint. This helps you visualize the layout before digging. Keep edges smooth and balanced.
Dig the pond in layers. Create shelves for plants and a deeper center for fish. Make sure the base is level to prevent uneven water depth.
Add a 1–2 inch sand layer to protect the liner from sharp stones. Then place the liner carefully, leaving extra material around the edges. Press it gently into the corners without stretching.
Secure the liner with rocks or soil around the edges. Fill the pond slightly with water to help it settle into place.
Time Required: 1–2 days
Common Mistake: Uneven base causing water imbalance
Pro Tips:
- Remove sharp objects before placing the liner.
- Avoid pulling the liner too tight.
- Double-check levels from all sides
Installing Pump & Filter System
Choosing the right pump is critical for water health. Match the pump size to your pond volume. A good rule is to circulate all water every 1–2 hours.
For koi ponds and swimming ponds, use strong filtration systems. These handle waste and keep water clear. Small backyard ponds may need simpler filters.
Place the pump at the deepest point for best performance. Position the filter where water can flow naturally back into the pond. This improves circulation and oxygen levels.
Keep pipes short and direct to reduce energy loss.
Time Required: 2–4 hours
Common Mistake: Using an undersized pump
Pro Tips:
- Choose a slightly larger pump for better flow.
- Clean filters regularly for efficiency
- Use a waterfall return for added aeration.
Rocks, Gravel & Landscaping
Now it’s time to give your pond a natural and finished look. Start by adding gravel at the bottom. This helps anchor plants and supports beneficial bacteria.
Use rocks to cover liner edges. You can choose a natural style with uneven stones or a formal look with clean edges. Both styles work if done properly.
Place plants in different zones. Marginal plants go on shelves, while floating plants stay on the surface. This creates balance and improves water quality.
Take your time with design. Good landscaping makes your pond look more professional.
Time Required: 1 day
Common Mistake: Leaving liner edges exposed
Pro Tips:
- Use a mix of rock sizes for a natural feel.
- Avoid overcrowding plants
- Secure rocks properly to prevent shifting.
Filling the Pond & Water Testing
Fill your pond slowly using a garden hose. Avoid strong water pressure, which can disturb the liner or plants. Let the pond settle as it fills.
If you’re using tap water, add a dechlorinator to remove harmful chemicals. This step is important before adding fish.
Test water quality using a basic test kit. Check pH, ammonia, and nitrate levels. Balanced water keeps fish and plants healthy.
Wait a few days before adding fish. This allows the system to stabilize. Start with a small number of fish and monitor their behavior.
Time Required: 1–2 days
Common Mistake: Adding fish too early
Pro Tips:
- Always dechlorinate tap water.
- Test water regularly in the first week
- Introduce fish gradually to avoid stress.
Adding Plants, Fish & Wildlife
This stage brings your pond to life. After pond DIY construction, adding plants and fish creates a balanced ecosystem. A healthy mix improves water quality and reduces maintenance.
Plants filter the water, fish add movement, and wildlife supports natural balance. Start slowly and choose species that match your pond size and climate.
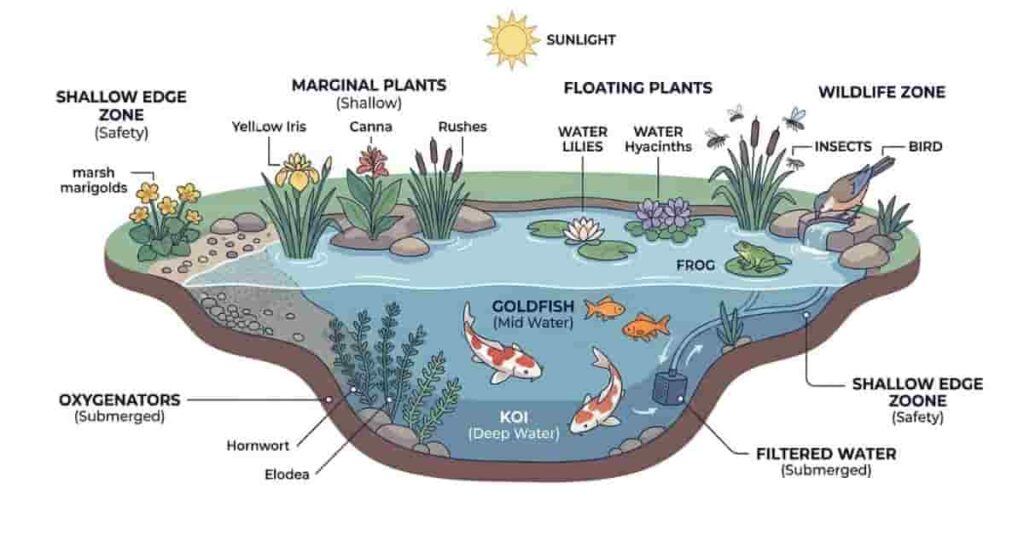
Aquatic Plants for DIY Ponds
Aquatic plants are essential for clean and healthy water. They absorb nutrients, reduce algae, and provide shelter for fish.
There are three main types to include:
- Oxygenators: Improve water quality and support fish health
- Marginal plants: Grow on pond edges and add structure
- Floating plants: Provide shade and reduce algae growth
Place plants in different zones for balance. Use shelves for marginal plants and keep floating plants spread out.
Seasonal care matters in the USA. In colder regions, remove dead leaves before winter. In warmer areas, trim plants regularly to control growth.
Pro Tips:
- Don’t overcrowd plants; leave open water space.
- Choose native plants for better survival.
- Trim regularly to prevent overgrowth.
Fish for DIY Ponds
Fish add life and color to your pond. Popular choices include koi and goldfish, both suitable for different pond sizes.
Koi need deeper ponds and strong filtration. Goldfish are easier to manage and great for beginners. For natural swimming ponds, native fish species work best.
Feed fish small amounts once or twice daily. Overfeeding can pollute the water and harm fish health. Always remove leftover food.
Winter care is important in colder regions of the USA. Fish slow down in cold water and need less food. Make sure part of the pond stays unfrozen for oxygen exchange.
Pro Tips:
- Start with a small number of fish.
- Monitor water quality regularly.
- Avoid mixing aggressive fish species.
Encouraging Wildlife
A well-designed pond naturally attracts wildlife. Birds, frogs, and beneficial insects help maintain a healthy ecosystem.
Add shallow edges or stones so animals can safely access the water. Plants around the pond create shelter and nesting spots.
Avoid using chemicals, as they can harm wildlife. Natural balance is better for long-term pond health.
You may start seeing birds drinking water, frogs controlling insects, and dragonflies reducing pests. This makes your pond more lively and eco-friendly.
Maintenance & Troubleshooting
Taking care of your pond is easier than you think! After you finish your DIY construction, looking after your pond becomes a simple, enjoyable part of your weekly routine. Just a few quick checks each week can keep things running smoothly and save you from bigger headaches later!
When your pond is well cared for, it becomes a wonderful home for fish, plants, and sparkling water. Focus on easy cleaning, staying ahead of pesky algae, and catching little problems early—your future self will be glad you did!
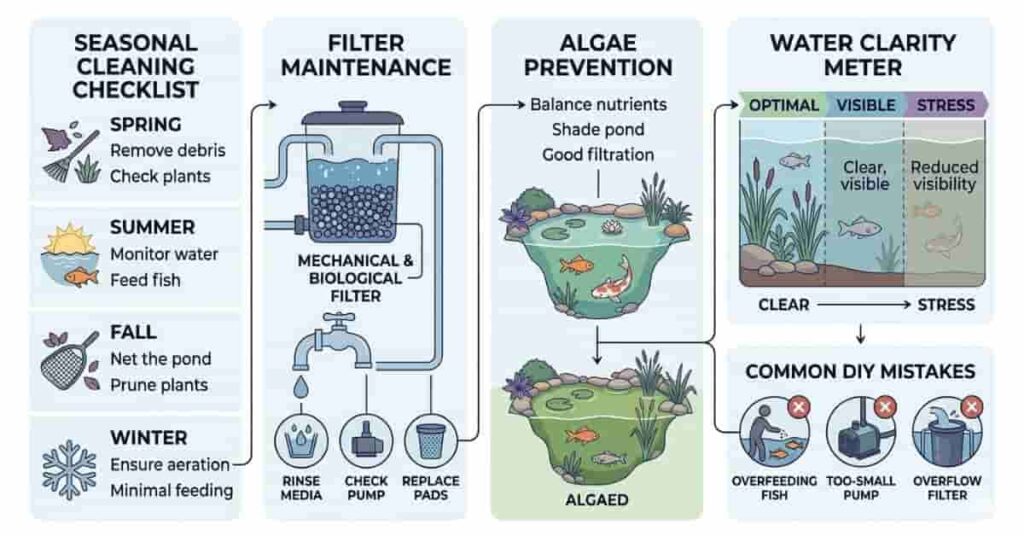
Seasonal Cleaning & Filter Maintenance
Every season brings its own pond care routine. In spring, scoop out that winter debris and get your pump and filter running. (A pump moves water through the pond, and a filter is a device that cleans the water by removing particles.) Give leaves, sludge (thick, soft mud or organic matter at the bottom), and equipment a quick check so everything’s in top shape!
Summer’s here! Keep an eye on your water level and give your filters a good clean more often. The warm weather can bring more algae and waste, so help your pond stay happy by keeping the water moving! Your pond will thank you for it.
In the fall, remove falling leaves before they sink and decay. Use a net if needed. In winter, reduce maintenance but keep a small opening in the ice for gas exchange. (Gas exchange means letting oxygen enter and harmful gases escape.)
Clean your filter regularly, but there’s no need to overdo it. Helpful bacteria call your filter home, and they work hard to break down waste for you. (Bacteria in the filter convert harmful substances into safer forms for fish and plants.)
Pro Tips:
- Rinse filters with pond water, not tap water.
- Check pump performance every week.
- Remove debris before it builds up.
Algae Prevention and Water Clarity
Algae can be a pesky problem in DIY pond projects, especially when you’re just getting started. It’s most common when there’s too much sunlight and nutrients.
You can fight algae by finding the right balance of plants and sunlight. Try adding a few more floating plants for extra shade—nature’s way of reducing algae!
Avoid overfeeding your fish—leftovers just add extra nutrients for algae. Stick with a good filter system and enjoy crystal-clear water!
If algae gets out of hand, don’t stress! Remove it by hand, or safely use treatments meant for ponds.
- Maintain a good plant-to-water ratio. (A plant-to-water ratio is the balance between the number of pond plants and the amount of water, which helps control algae and maintain water quality.)
- Limit direct sunlight exposure.
- Test water regularly for balance
Common DIY Mistakes and How to Avoid Them
It’s common for beginners to hit a few snags. Spotting these early can save you time, money, and a lot of worry!
Some common problems include:
- Poor filtration is causing dirty water.
- Overstocking fish leads to waste buildup. (Overstocking means having too many fish for your pond’s size, which produces more waste than your filter and plants can process.)
- Wrong pond placement with too much sun or shade
- Adding fish before water stabilizes
You can easily avoid these common pitfalls by planning ahead and keeping a close eye on your pond. Remember to always check your water conditions before making any changes—your fish and plants will thank you!
Pro Tips:
- Start small and scale gradually.
- Invest in a good pump and filter.
- Learn basic water testing early.
Safety Tips & Legal Considerations
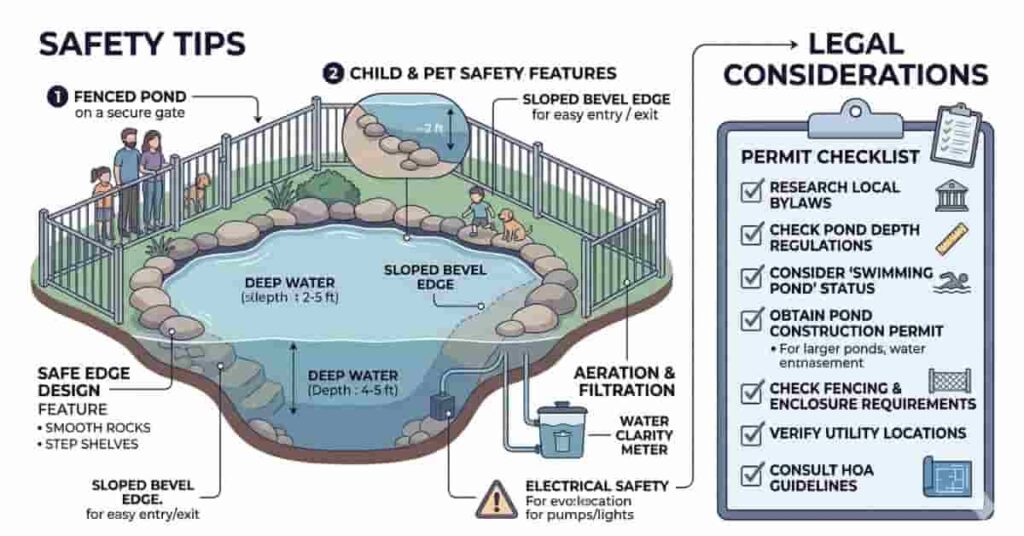
Safety always comes first, especially with pond DIY projects. A beautiful pond is even more enjoyable when you know it’s safe for everyone, including kids and pets!
Along with safety, you must also follow local rules. Some areas in the USA require permits for larger or swimming ponds. Planning ahead helps you avoid legal issues later.
Fencing, Child and Pet Safety
If you have children or pets, install a secure barrier around your pond. Even the shallowest pond can be risky without supervision. A simple fence or cover adds peace of mind for your whole family.
Use non-slip stones or edging materials to prevent falls. Avoid steep edges that make it hard to get out of the pond. Adding gradual slopes can improve safety.
You can also install pond nets or covers for extra protection. These help prevent accidents and keep debris out.
Always keep safety in mind when designing your pond layout.
Pro Tips:
- Use self-closing gates for fenced ponds.
- Add lighting for better visibility at night.
- Keep rescue tools nearby, like a long pole.
Local Regulations and Permits
Before starting your project, check local regulations in your area. Rules may vary depending on pond size and purpose.
Large ponds or natural swimming ponds may require permits. Some areas have safety codes for fencing, depth, and drainage systems.
You may also need approval if your pond affects water flow or connects to drainage systems. Ignoring these rules can lead to fines or forced changes.
Contact your local authority or municipality for accurate information. It’s better to confirm everything before construction begins.
Pro Tips:
- Check zoning laws before digging.
- Ask about permit requirements for large ponds.
- Keep records of approvals and plans.
Enhancements & Aesthetic Ideas
Now that your pond is complete, it’s time to have fun and give it some personal flair. Enhancements can turn your hard work into a gorgeous backyard highlight—plus, these ideas will make your space even more relaxing!
Focus on features that match your space and style. Even small additions can make a big visual impact without increasing maintenance too much.
Waterfalls, Fountains, Lighting & Rock Features
Water features add movement and sound to your pond. A small waterfall or fountain improves water circulation and creates a calming effect. It also helps with oxygen levels, which benefits fish and plants.
Lighting makes your pond stand out at night. Use LED lights around edges or underwater for a soft glow. This creates a peaceful atmosphere and improves visibility.
Rocks play both a functional and a visual role. Use them to hide liner edges and create a natural look. You can mix large and small stones for a better texture.
Pro Tips:
- Use energy-efficient LED lights.
- Position waterfalls near the pump outlet
- Secure rocks to prevent shifting
Landscaping Ideas to Match Your Backyard Style
Good landscaping blends your pond with the rest of your yard. Choose a style that fits your home design, whether modern or natural.
For a natural look, use curved edges, native plants, and uneven stones. This creates a soft and organic feel. For a formal style, use straight edges and clean lines.
Add seating areas near the pond to enjoy the view. You can also include pathways, wooden decks, or small bridges for extra charm.
Plants around the pond should complement the design. Use a mix of heights and colors for balance.
Pro Tips:
- Match pond design with your garden theme.
- Use native plants for easy maintenance.
- Add seating for a relaxing experience.
Before starting your build, it’s important to understand planning and layout — this beginner’s backyard pond setup guide explains everything step by step.
Conclusion
Building a backyard water feature is easier than it seems when you follow the right steps. This guide covered everything from planning and choosing the right location to selecting plants, fish, and safety tips. By following this pond DIY construction process, beginners in the USA can create a beautiful, balanced pond that suits their space and style.
If you’re new, start small and build confidence as you go. Enjoy adding new features, watching wildlife settle in, and celebrating your progress. For more tips, check our [pond pump guide], [backyard pond setup guide], or [koi pond setup guide]. Share your pond-building experiences or questions in the comments to inspire other beginners!
This ensures a healthy, relaxing, and eye-catching pond for years to come.
Michael Brooks and Sarah Lane are the co-founders of the Pond Pump Team, a trusted U.S.-based group helping homeowners and landscapers build better ponds and water features. Michael, an experienced pond engineer from Oregon, has worked for over 12 years on pump sizing, flow systems, and water circulation. Sarah, a pond designer from Colorado with nine years of experience, focuses on eco-friendly and easy-to-maintain pond and waterfall designs. Together, they’ve completed more than 180 pond projects and created tools like the Pond Pump Calculator and Pond Liner Calculator to make pond planning simple, accurate, and sustainable.
Need help with your pond setup? Contact the Pond Pump Team for expert advice and reliable solutions.