Table of Contents
Introduction
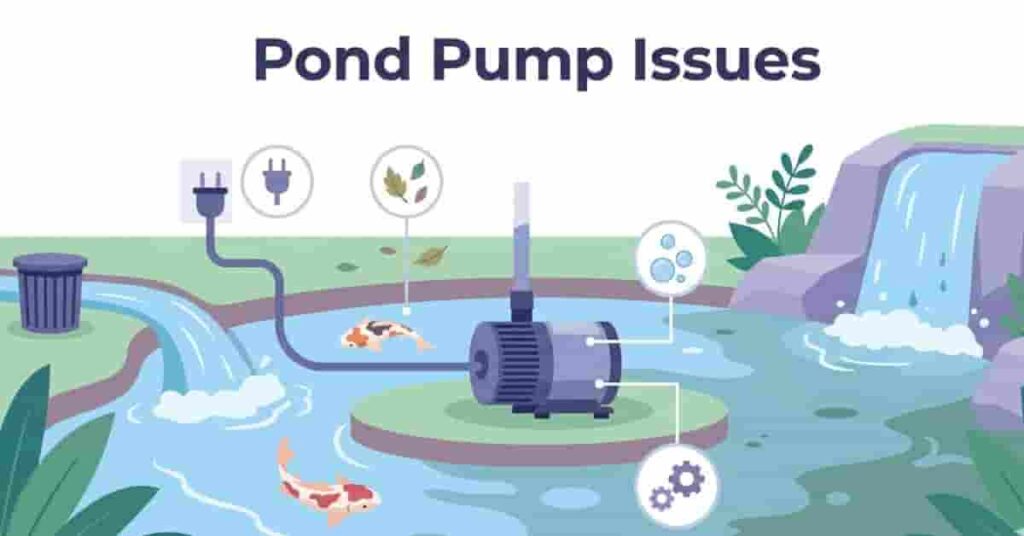
Pond pump suddenly silent or barely moving?
If you’re searching for how to repair a pond pump, you’re not alone. Many beginners in the U.S. face this issue. Pumps often fail due to clogs, worn impellers, motor faults, or simple wiring problems. The good news? Most of these issues are fixable at home without special skills.
Repairing your pump saves money and reduces downtime. Quick fixes keep your pond healthy and water flowing efficiently.
This step-by-step guide shows how to inspect and fix pump problems. Learn to restore water flow for a healthy pond in minutes.
Common Reasons Pond Pumps Stop Working
Most pond pump problems come from a few simple issues. If you understand these, you can fix your pump faster. This also helps you avoid damage in the future.
Many beginners jump straight to replacing the pump. However, simple issues like clogs or misalignment are often to blame. Before we dive into the specifics, let’s break down the most common reasons.
Takeaways
- Most pump failures are easy to diagnose at home.
- Clogs and impeller issues are the top causes.
- Early detection prevents costly repairs.
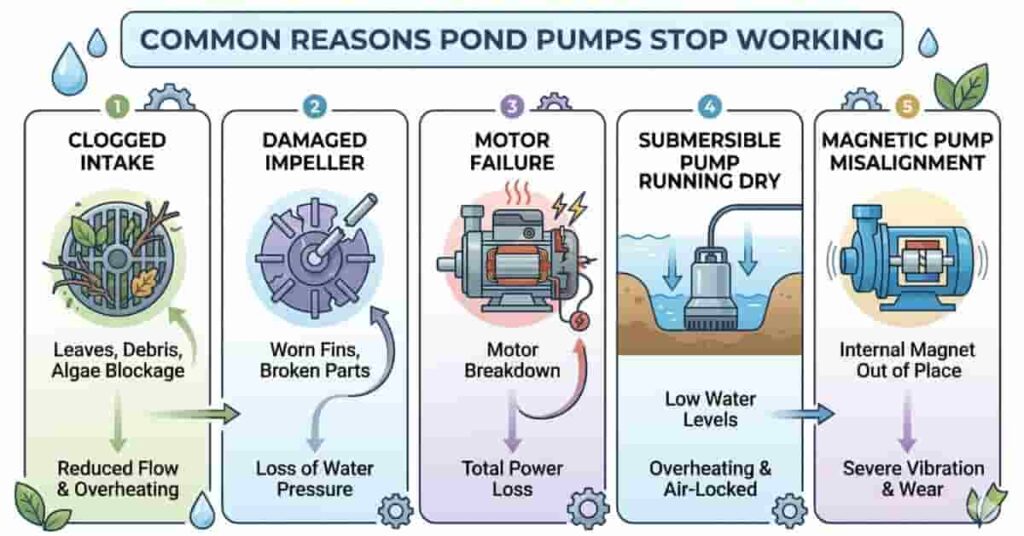
Clogged Intake or Filter
Debris is the number one reason pumps stop working. Leaves, algae, and dirt block water flow quickly. When this happens, the pump struggles or shuts down.
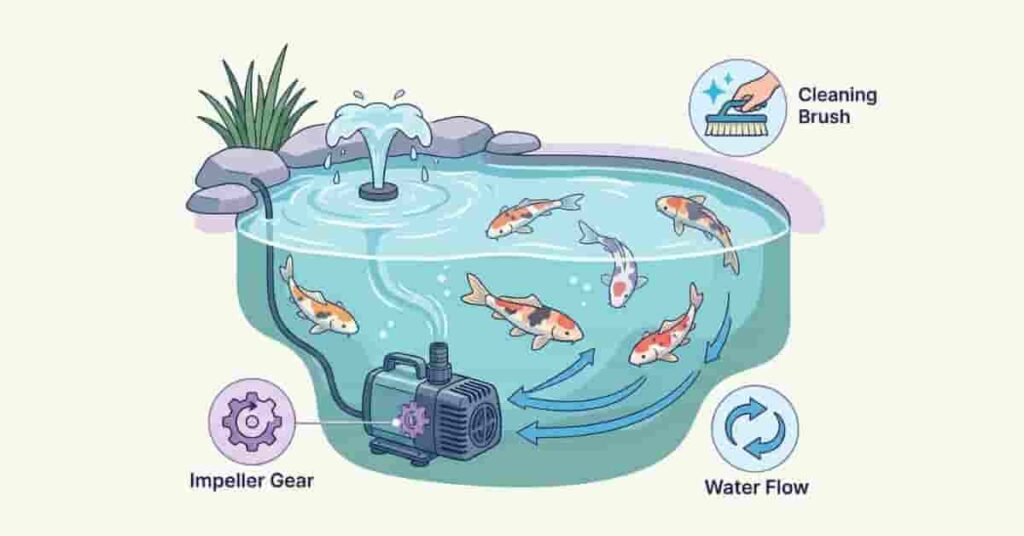
Check the intake area and filter housing. If water cannot enter freely, the pump cannot function. This is common in fish and koi ponds.
Regular cleaning prevents this issue. A quick rinse every week can save hours of repair later.
Damaged Impeller
The impeller is the heart of your pump. It spins to move water through the system. If it cracks, wears out, or gets stuck, the flow drops instantly.
Small stones or debris can damage the blades, and normal wear reduces efficiency. This highlights the need for impeller repair.
If you hear a grinding noise, check the impeller first. It’s often the easiest fix.
Motor Failure or Wiring Issues
If the pump does not turn on, the motor may be the problem. Faulty wiring, loose connections, or burned windings can stop power flow.
Check the power cable and plug for visible damage. Also, inspect connections inside the pump housing.
Sometimes, a simple wire replacement fixes the issue. In serious cases, the motor may need repair or replacement.
Submersible Pump Running Dry
Submersible pumps need constant water to stay cool. If water levels drop, the pump can overheat fast.
Running dry can damage seals and internal parts. This is a common issue in summer or during evaporation.
Always ensure the pump stays fully submerged. This is a key step in submersible pond pump repair.
Magnetic Pump Alignment Issues
Magnetic pumps rely on proper alignment to work smoothly. If the impeller or magnet shifts, the pump loses efficiency.
Dirt buildup can also cause friction and misalignment. This leads to weak water flow or noise.
Cleaning and realigning the parts usually solves the problem and is vital for magnetic pump repair.
Pro Tip
Start with the simplest checks first—cleaning and inspection solve most problems. Avoid opening the motor unless necessary.
Safety Precautions Before Repair
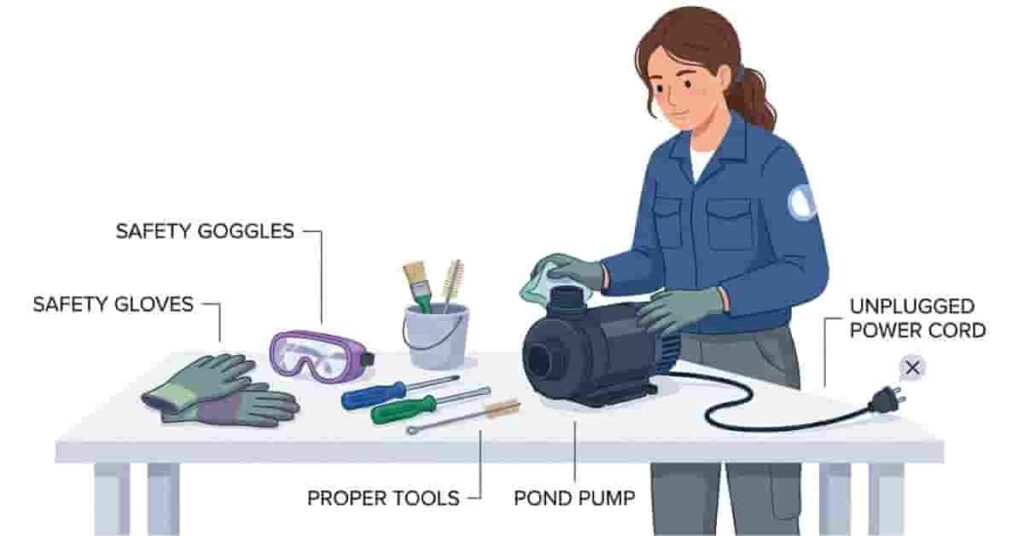
Before repairing a pond pump, put safety first. Pond pumps use both electricity and water, which can be risky. A few simple precautions protect you and your equipment.
Skipping safety steps can lead to electric shocks or pump damage. Take a few minutes to prepare and avoid bigger problems.
Follow these basic safety steps before repairing a pond pump impeller or motor.
Takeaways
- Always cut the power before touching the pump.
- Use the right tools for safe and easy repair.
- Basic safety steps prevent serious damage.
Turn off the power and unplug the pump
Never handle a pond pump while it is connected to power. Even a small current can cause a dangerous electric shock. Water increases this risk.
Switch off the power source completely first. Unplug the pump from the outlet next. If your setup includes a breaker, turn it off as well.
After unplugging, remove the pump carefully from the water. Let it sit for a few minutes before you open it. This step prevents internal damage and keeps you safe.
Pro Tip
Use a dry towel or wear gloves when you unplug the pump to reduce shock risk.
Use Proper Tools
Use the right tools to repair the pump easily and safely. Avoid random tools that can damage pump parts.
You will usually need:
- Screwdrivers (flathead and Phillips)
- Soft brushes for cleaning debris
- Replacement impellers or seals
- Clean cloths for drying parts
Wear gloves to protect your hands from sharp edges. Put on safety goggles to shield your eyes from dirt or splashes. Prioritize safety gear.
Use good tools to finish repairs faster and reduce the chance of breaking small components.
Pro Tip
Keep all parts in one place while disassembling the pump. This makes reassembly much easier.
Step-by-Step Pond Pump Repair Guide
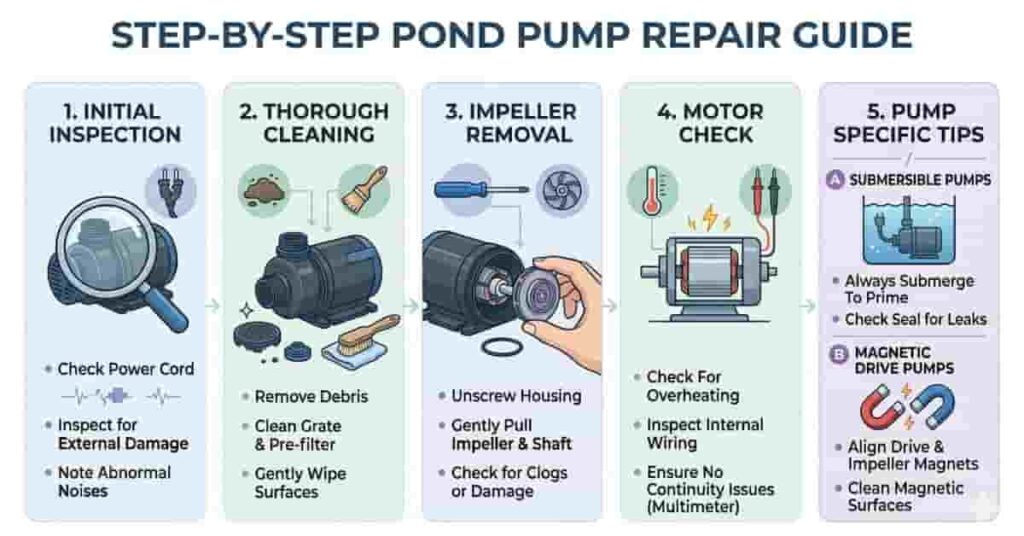
Follow these step-by-step instructions to repair your pond pump. Diagnose the issue efficiently and avoid guesswork. Most problems result from dirt, worn parts, or small electrical faults.
Once you’ve outlined basic troubleshooting, approach deeper inspections as needed. This structure applies to a range of pumps, such as submersible and magnetic models.
Takeaways
- Inspect first before opening or replacing parts.
- Cleaning solves many common issues.
- Handle impeller and motor parts with care.
Inspect the Pump
Begin with a full visual inspection. Inspect for cracks (breaks in the pump shell), rust (reddish-brown corrosion on metal parts), or white mineral buildup (hardened deposits from water) on the pump body. These signs usually indicate long-term wear or water quality issues.
Check hoses and fittings. Ensure all hoses are tight, clear, and free from blockages, as loose or blocked hoses can reduce water flow.
Always perform a quick inspection at the start. This step often reveals the real problem and prevents overlooking obvious issues.
Pro Tip
Take a quick photo before opening the pump. It helps during reassembly.
Cleaning Before Repair
Clean the pump and its parts, as dirt, algae, and debris frequently block water flow and strain the pump.
Remove the outer cover and rinse all parts with clean water. Use a soft brush to scrub off algae and buildup. Avoid harsh chemicals, as they can damage parts.
Flush the internal water channels to remove hidden dirt. Also, clean the impeller housing carefully.
After cleaning, test the pump to see if it works. Many pumps start working again with proper cleaning alone.
Pro Tip
Use a small toothbrush to clean tight spaces around the impeller.
Impeller Repair or Replacement
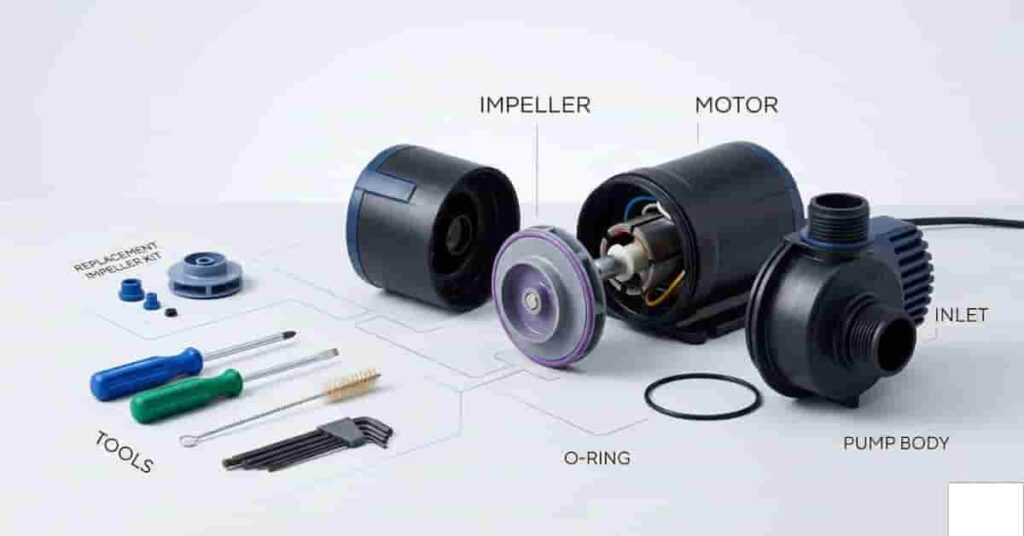
Ensure the impeller, a spinning blade or rotor inside the pump that moves water, is not damaged so the pump can work properly.
Remove the impeller cover and gently take out the impeller. Examine it for cracks, broken blades, or signs of wear, and replace with a matching part if needed.
Install the new impeller in the same position. Ensure it spins freely before closing the housing. Lubricate lightly if movement is stiff.
This step is key to any pond pump impeller repair.
Pro Tip
Always use the correct impeller size for your pump model.
Motor and Wiring Repair
Inspect the motor and wiring if the pump still does not run. Look for burnt smells, loose wires, or damaged insulation.
Carefully inspect the power cable (the electrical cord supplying power to the pump). If you see cuts or exposed wires, replace them. For deeper issues, use a basic tester to check motor continuity (to confirm the unbroken electrical connection).
If the motor shows no continuity, pursue repair or replacement. This situation occurs more frequently in older pumps.
Pro Tip
Consult a technician if you are unsure about wiring to prevent risk.
Submersible Pump Specific Tips
Keep submersible pumps underwater during operation. Running them dry may damage seals and overheat the motor.
Check water levels before turning the pump on. Also, inspect seals for leaks, as water entering the motor can cause failure.
Follow these steps for all submersible pond pump repairs.
Pro Tip
Place the pump slightly above the pond bottom to reduce debris intake.
Magnetic Pump Specific Tips
Ensure magnetic pumps remain smoothly aligned by keeping the magnetic and mechanical parts precisely positioned so they function together. Avoid impeller or magnet shifts, as these quickly reduce performance.
Open the pump and clean the magnetic components. Remove dirt to prevent friction and noise. Ensure the impeller is seated properly on the shaft.
Align magnetic parts properly to restore normal water flow and repair magnetic pond pump systems.
Pro Tip
Never force the magnetic parts into place. They should align naturally.
Repairing Pond Pumps in Different Pond Types
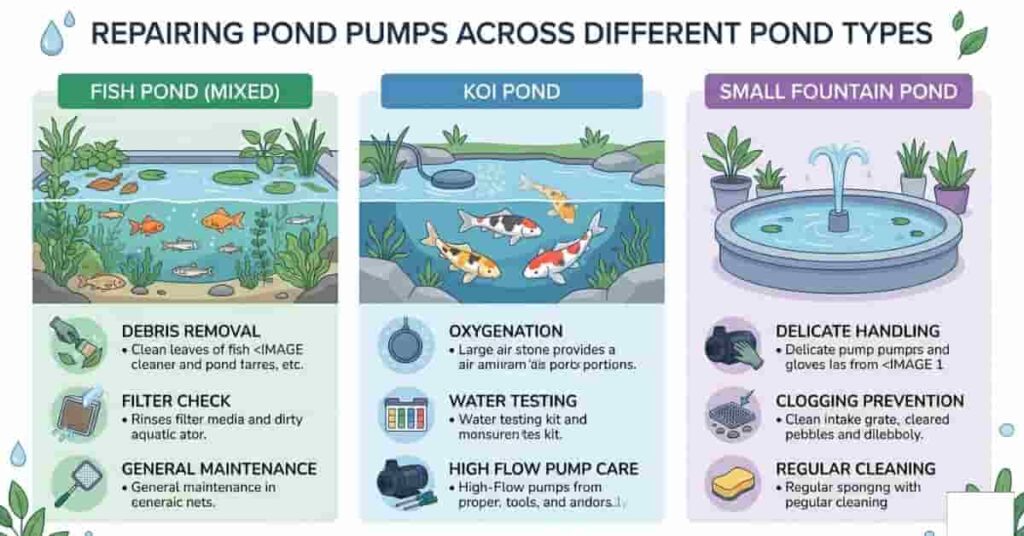
Not all ponds are the same, so repair steps differ. Pump handling in a fish pond may not match that for a koi or fountain setup. Recognizing these differences helps ensure safe repairs and protects pond life.
When repairing a pond pump, always consider pond size, fish type, and pump design. Small changes to your approach matter.
Takeaways
- Match your repair method to your pond type.
- Protect fish and water quality during repairs.
- Smaller pumps need gentler handling.
Fish Pond Pump Repair
Fish ponds collect organic waste that clogs pumps. Remove debris from the intake and filter.
Check and rinse filter sponges with pond water—not tap water—to protect beneficial bacteria.
Gently move the pump without stirring debris. If repairs take time, have a backup aerator ready for fish safety.
These steps make fish pond pump repair safer and more effective.
Pro Tip
Keep a small backup air pump ready in case your main pump stays off longer than expected.
Koi Pond Pump Repair
Koi ponds need extra care because koi are large and sensitive; even small water changes can be stressful.
Before repair, keep the pond oxygenated with an air pump or temporary fountain to maintain good oxygen levels.
Avoid sudden movements near koi while working. Panicked koi may injure themselves.
Look for heavy debris buildup, as koi ponds often have stronger pumps to handle more waste.
Pro Tip
Feed koi less during repair days to reduce waste and keep water cleaner.
Small Pond or Fountain Pumps
Small pond and fountain pumps have delicate, easily damaged parts. andle the pump gently when opening it. Avoid using too much force on screws or covers. Even a small crack can affect performance.
FocClean the mini impeller gently with a soft brush or cloth. Ensure all parts are dry before reassembly. These pumps usually respond well to simple cleaning and light maintenance.
Pro Tip
Work on a clean surface so small parts don’t get lost.
Common Mistakes to Avoid
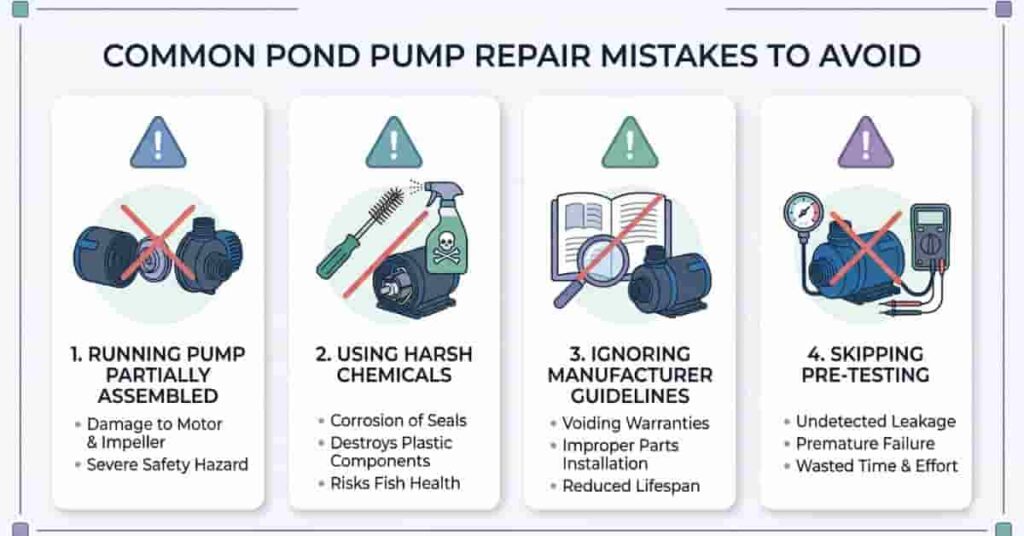
Learning to repair a pond pump can be a real adventure! It’s easy to make little mistakes along the way, but don’t worry—you can avoid most of them. By keeping these tips in mind, you’ll save time and keep your pump happy.
Even simple steps like cleaning or putting your pump back together deserve some care. Take your time, and your pump will thank you by working better and lasting longer!
Takeaways
- Always reassemble the pump fully before use
- Avoid chemicals that can damage parts.
- Test the pump before placing it back in the pond.
Running Pump While Partially Assembled
It’s tempting to check your fix right away, but resist the urge to power on before everything is back in place. Loose parts can cause trouble inside, like shifting or leaks, and your pump deserves a smooth start!
Take an extra moment to make sure every screw, seal, and cover is snug. Giving special attention to the impeller placement before turning it on helps everything run smoothly!
Using Harsh Chemicals
While strong cleaners might seem like a quick fix, they’re not your pump’s best friends. Chemicals can be hard on plastic parts, seals, and the impeller, too.
Leftover chemicals aren’t good for your pond, either. They can upset your fish and plants, so it’s best to skip them!
Try using just clean water and a soft brush. Your pump—and your pond—will be much happier!
Ignoring Manufacturer Guidelines
Every pump has its own instructions, and it’s worth taking a look! Following the manual helps you make the right repairs and keeps your warranty safe.
Before swapping out parts—especially on the motor or anything electrical—give the user manual a quick read for peace of mind.
Skipping Pre-Testing After Repair
Many users place the pump back in the pond without testing it first. This can lead to repeated issues if something is still wrong.
Try running the pump in a bucket of clean water. Listen for normal sounds and check that the water flows steadily—easy and worth it! His simple step ensures your repair was successful.
When to Replace Your Pond Pump
Repairing isn’t always best. Know when to stop fixing and replace your pump—excessive repairs waste time and money on irreparable pumps.
A good rule is simple: if repair costs approach the price of a new pump, replacement makes more sense, ensuring better performance and long-term reliability.
Takeaways
- Replace the pump if damage is severe or repeated.
- Frequent faults often signal deeper issues.
- New pumps are more efficient and reliable.
Motor Completely Burned Out
If the motor is completely burned out, replacement is best. Signs: strong burnt smell, no power, failed continuity tests.
Motor replacement can be expensive and complex. This is one reason why buying a new pump is often the better choice, as you’ll see in other scenarios below.
Impeller or Shaft Irreparably Damaged
A broken impeller or bent shaft halts water flow. Minor damage can be fixed; severe wear can’t.
If parts are unavailable or costly, replace the pump.
Recurrent Issues Despite Repairs
If the pump still fails after repairs, deeper issues exist—like worn or aging parts.
Frequent repairs accumulate. A new pump saves effort and ensures stable performance.
Frequent Electrical Faults
Wiring or power issues remain serious. Exposed wires, shorts, or tripped breakers are risks.
These faults are dangerous and hard to fix. Replacement is safer.
Quick Pond Pump Repair Checklist
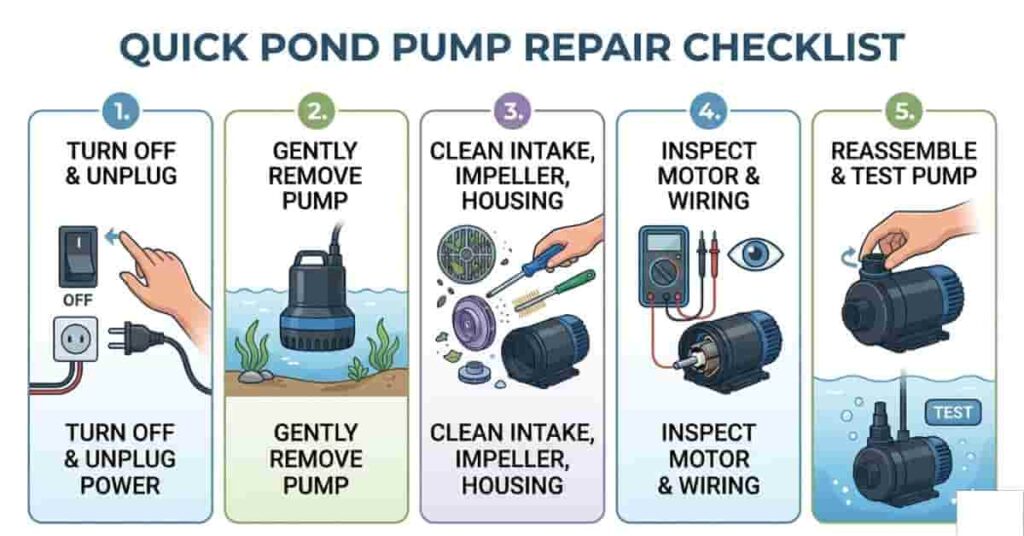
A simple checklist shows how to repair a pond pump faster and safer. It ensures you don’t miss any critical steps while keeping your pond equipment in good shape. Use this as a quick reference for routine repairs or maintenance.
Staying organized reduces mistakes and extends pump life. Even beginners can follow this easily.
Takeaways
- Follow each step in order for safe repair.
- Quick inspections prevent major issues.
- Use this checklist for both routine maintenance and emergency fixes.
Pond Pump Repair Steps
- Step 2: Turn Off and Unplug – Start by cutting power before touching the pump to prevent electric shock.
- Step 3: Remove Pump – After the power is off, carefully lift the pump from the pond, avoiding debris and disturbing fish.
- Step 4: Clean Intake, Impeller, and Housing – Use clean water and a soft brush to remove algae, dirt, and debris. Avoid harsh chemicals.
- Step 5: Inspect Motor and Wiring – Check for burnt wires, loose connections, or damage after cleaning. Replace or repair as needed.
- Step 6: Reassemble and Test – Put the pump back together, ensuring all parts are in place. Test in clean water before returning to the pond.
Following this checklist prevents mistakes and keeps your pump working smoothly. Use it for fish ponds, koi ponds, and small fountain pumps.
Conclusion
In this guide, we covered the most common pond pump problems and how to fix them step by step. Most issues come from clogs, worn impellers, or motor faults. By learning how to repair a pond pump, you can restore water flow, extend the pump’s life, and save money compared to replacements. We also explored techniques for fish ponds, koi ponds, submersible pumps, and magnetic models, so beginners can tackle repairs safely and confidently.
Regular cleaning, inspection, and proper handling prevent major failures and keep your pond healthy year-round. Simple repairs, like impeller or motor checks, often solve problems before they escalate.
Put these steps into action on your own pump and see the improvement for yourself. Share your success stories in the comments, and don’t hesitate to visit our website for more in-depth DIY pond care tips and personalized support on your projects.

Michael Brooks and Sarah Lane are the co-founders of the Pond Pump Team, a trusted U.S.-based group helping homeowners and landscapers build better ponds and water features. Michael, an experienced pond engineer from Oregon, has worked for over 12 years on pump sizing, flow systems, and water circulation. Sarah, a pond designer from Colorado with nine years of experience, focuses on eco-friendly and easy-to-maintain pond and waterfall designs. Together, they’ve completed more than 180 pond projects and created tools like the Pond Pump Calculator and Pond Liner Calculator to make pond planning simple, accurate, and sustainable.
Need help with your pond setup? Contact the Pond Pump Team for expert advice and reliable solutions.